
What is there behind the drawing in your T-shirt?
I recently made a personalised t-shirt, for someone who loves fishing. He told me he wanted a fish, and the fish he wanted, a gilt-head bream fish. We discussed a bit his ideas, and agreed on a basis for the design style, which for an optimal result would also drive the color of the t-shirt. In this entry I will show the whole process, and the final result which I am very happy about.
The gilt-head bream fish is one of the most tasty Mediterranian fishes. In latin, its name is Sparus aurata, where "aurata" refers to the golden bar between its eyes. Ok, this is all I know about it, besides that it is indeed very good! Wikipedia will probably tell you more, so I will talk about the design part.
The idea for the T-shirt was that the details and the characteristics of the fish were visible, and at the same time, that the design was simple enough to be easily printable.
The first step is of course to draw it, for which I used ink, as it allows to draw details using clean and simple traits, and it is easily transferrable to the computer.

Hand-drawn gilt-head bream fish
The second step is to make it printable in a T-shirt, and create the whole design. An idea that came when working on it: actually one could draw the fish in the front, and the bones in the back of the T-shirt, so when people sees you coming sees the whole fish, but when they see you going away they only see the bones, the head and the tail, as if you'd eaten it. So I went back to the drawing board and drew the bones.
Hand-drawn bones
Then I scanned everything and started the design process. What happens when you scan something? You have pixels, the white background of the paper, or the white background of the scan machine itself. But you do not want the white square of your paper or your scanner to appear in your T-shirt, so some treatment is required before printing. In this case, I chose to vectorise the image, to be able to work on its elements separately. This is an option you don't always have, and has to be done with care, but here it worked out quite nicely. So I removed the background, and I worked on the image to remove some of the white filling in the fish body and fins to give them an "unfinished" appearance that would suit for a T-shirt, and at the same time, highlight the fish head and tail. While preparing the image, I added a black background to easily see all of its elements, and make sure no unwanted white areas from the paper background remained.

Front side fish as it will go in the T-shirt
For the back side I followed a similar process. When all background was gone I merged it with the head and the tail from the front side, to give the fish the appearance it would have after it has been eaten.

Back side fish as it will go in the T-shirt
The final images must be background free, and the only additional color will be given by the T-shirt color. In this case, the person who ordered it wanted it in black... and here is the final result!
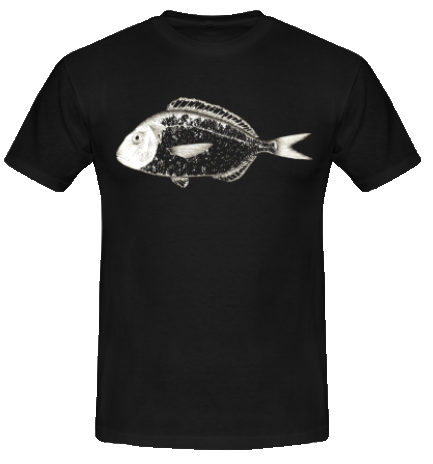
T-shirt in black, front side

T-shirt in black, back side
There are many ways of designing T-shirts, most of the times one starts directly with the computer with vector images and the process becomes different. It also depends on the clothing one wants to use, and of course (and very importantly), on the final printing process. But this would be another entry...
es muy bonita
ReplyDelete